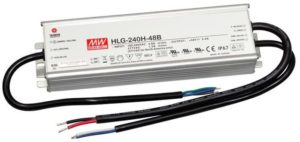
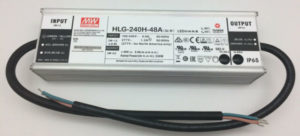
The most common questions we’re asked are “Which driver should I use?”, “How do I dim my boards?”, “What is the difference between Mean Well A, AB and B type drivers?” and “What is the difference between a constant voltage driver and a constant current driver?”
Let’s answer some of those questions.
Which driver?
As we now sell customised uPowerTek drivers with onboard, push-button waterproof dimmers, much of the information below will not be relevant to these models. However, if you have a Mean Well driver or are planning to purchase one for a project, read on, as this article unravels some of the Mean Well mysteries . . .
All the Mean Well drivers we sell have a dimming function, and all our High Light boards and kits come with supplied drivers or driver recommendations. If you already own a driver on the list, it will work with our boards. But there are other drivers not on the list that will also work with our boards – it simply comes down to which driver gives the best result for any particular application.
Driver choice will depend on how many LED panels you wish to run and how hard you want to drive them.
The harder you drive your LEDs, the less efficient they are, with losses typically in the region of 5-10%.
Some growers run higher numbers of LED boards at lower currents to take advantage of these efficiency gains, as well as provide wider and more even light coverage over their plants. Lower currents can also extend the life of the LEDs, as they run cooler.
Other growers run fewer boards at higher currents to take advantage of the high output of High Light boards (up to 225W-235W each). This saves money on initial outlay and more boards can be added later to increase efficiency and canopy coverage.
Whatever current the boards run at, there is one golden rule: the higher the current, the higher the voltage requirements. All LEDs work like this.
This is the reason we suggest both 48V and 54V drivers for our High Light 420 LED panels.
High Lights will draw 44-45V at lower currents – typically between 2A and 3A – for a total power consumption of around 88-135W (44V x 2A = 88W; 45V x 3A = 135W).
But at higher currents, the boards will draw higher voltages – up to 47-48V at their maximum current of 5A (48V x 5A = 240W).
This is the tricky part: some drivers – such as the Mean Well “A” and “AB” type – will supply more than their rated voltage and current, and so can drive LEDs all the way up to and beyond their maximums.
Other drivers – such as the Mean Well “B” type – are limited to their rated voltage current, so can only supply enough voltage or current to drive each board up to their ratings. If the LED requires more voltage as the current increases, then it becomes “voltage limited”, as it cannot draw any more current because there is not enough voltage supply. If the LED requires more current as the voltage increases, then it becomes “current limited”, as it cannot draw any more current because the driver is maxxed out.
Because the High Light 420 boards draw anywhere from 44-48V, they can be run on any 48V or 54V driver.
To further confuse matters, drivers run more efficiently the harder you run them (the complete opposite of LEDs), so it pays to match your driver to your intended wattage.
It’s this balance between voltage, current and efficiency that determines how many watts a LED grow light draws and how much light it gives off.
But if you are still confused about which driver to buy, then we are here to help. Simply Contact Us and we will suggest the best driver based on your grow area, budget and lighting requirements.
And if you’re wondering what the other differences are between the “A”, “AB” and “B” type Mean Well drivers, please read on . . .
Mean Well “A”, “AB” and “B” models
All Mean Well drivers are constant current drivers. This means when you set the current it stays there – and the driver automatically adjusts the voltage.
Voltage will fall as the LEDs heat up and rise as the LEDs cool down – until they reach a state of equilibrium, where the current, voltage and temperature balance out.
Mean Well “AB” and “B” type drivers have an extra wire that can be connected to an external potentiometer or dimmer that can be used to adjust the current up and down. If the dimmer is not connected, the driver will output its full current at all times.
Mean Well “B” type drivers are slowly being phased out and replaced by the newer “AB” type.
 This is a Mean Well “B” type constant current driver. Note the two wires on the right: the top wire is the DC output to the LED board, the bottom is the dimmer wire that goes to a potentiometer to control the current. The wire on the left is the AC input wire that usually has a mains plug on it. “AB” drivers look the same.
Mean Well “A” and “AB” type drivers are referred to as “constant voltage” drivers – even though (confusingly) they are really constant current drivers. Both drivers have a screwdriver adjustment dial under a waterproof rubber cap for both current (Io ADJ) and voltage (Vo ADJ).
Most times you will adjust the current dial and the driver will act in constant current mode, limiting the amount of current (amps) to the LEDs, and adjusting the voltage automatically.
But by setting the voltage dial, you can also “voltage limit” the LEDs, which restricts them to only drawing as much current as the voltage limit allows (no matter where the current dial is set) – the driver is now working in constant voltage mode.
The “A” type drivers can only be adjusted with a small screwdriver that turns the Vo and Io dials after removing the rubber caps.
The “AB” type driver adds a dimmer wire so that you can adjust both the voltage and current on the driver (with a screwdriver) or the current with an external potentiometer or dimmer.
 A Mean Well “A” type constant voltage driver. Note the lack of dimmer wire and two adjustment dials under the black caps on the bottom right of the driver: one for voltage (Vo) on the left, and the other for current (Io) on the right.
Apart from being able to adjust the voltage, “A” and “AB” type drivers have another advantage over “B” type drivers – they always supply more than their rated voltage (up to 53V for some 48V “A” and “AB” drivers), while supplying more current than a higher voltage-rated “B” type driver.
Some growers prefer “A” type drivers with onboard dimming, whilst others prefer “AB” type drivers with the option of an external dimmer.
The advantage of the “AB” drivers is they can be externally dimmed (using a dial instead of a small screwdriver). The disadvantage is that most external dimmers (potentiometers) are not waterproof. “AB” drivers are normally a little more expensive than “A” drivers.
The advantage of the “A” drivers – apart from cost – is they remain IP65 waterproof as long as the rubber caps remain in place. Many growers rarely adjust their drivers once they have set them up, so do not require an external dimmer. The “A” drivers are easier to wire up and use for this reason.
How to adjust your driver
Unless you have a multimeter and are proficient at using it, the easiest way to set up a driver is to buy a cheap watt or power meter (also known as a wall or plug meter) from your local hardware, electronics or consumer goods store and plug it into the mains. You simply plug your driver in and read off the meter.
Most of the Mean Well range of drivers we sell run at 93-95% efficiency. This means when you plug the driver in, 5-7% of the total wattage is being consumed by the driver and the other 93-95% is being consumed by the LED boards.
A quick example would be a wall reading of 210W. In this example, 200W (95%) is going to the LEDs and 10W (5%) is going to the driver.
Unlike LEDs, drivers run more efficiently the harder you run them – so it pays to select a driver that will run close to the desired LED wattage at the driver’s maximum output.
Step 1
Turn the voltage dial (Vo) all the way up (clockwise), and the current dial (Io) all the way down (anti-clockwise).
Step 2
Make sure the driver is connected to the LEDs. Plug the driver into the wall meter and turn on the mains.
Step 3
Note the wall meter reading: as you turn the current up, the wattage will increase until you get to your desired wattage. However, as the LEDs warm up, the wattage will start to decrease.
Step 4
Allow the LEDs to run for 30 minutes to warm up and then re-adjust the driver to your preferred wattage (don’t forget to add 5-10% for the driver).
Step 5
You may now choose to voltage limit your LEDs by slowly turning the voltage dial down until just before it starts to reduce the power at the wall meter. Limiting the voltage in this way will ensure that if, for example, you have multiple boards wired up in parallel and one or more boards become accidentally disconnected, the remaining boards will not draw all the current and potentially burn out, because the driver will kick into constant voltage mode.
